
Six way to Increase The Maximum Upload File Size In WordPress
When you have a WordPress website, you have to upload files every now and then to keep your site active and pretty. So you need to know that there is more than one way to upload your picture, theme or any other content to your WordPress.
Basically, there are three ways to upload files in WordPress:
If you want to upload anything other than media, themes or plugins, you can always upload them via a file manager. However, for all normal uploads, simply navigate to your desired location within the WordPress Dashboard and choose to add/upload file.
For example, if you want to add a video, navigate to Media -> Add New and either select the file from your computer or you can just drag and drop it in the box. Here’s a screenshot:

Did you notice something weird, though? No, not in the article. In the screenshot above. Yes, the maximum upload file limit of just 5MB. Isn’t this off-putting? And this limit also applies when you want to upload a theme or plugin directly from the WordPress Admin Dashboard. This threshold varies from hosting to hosting though. Some even allow only 2MB by default while others may allow more.
Don’t worry though; we’re here to tell you exactly how to increase the upload limit.
While there are several ways to remove this cap on file size, we’ll be working with three settings within PHP that should deal with the upload limit. Let’s define the settings first so that you know what you’re actually doing:
Let’s assume we have a 20MB file. We’ll set the upload_max_filesize to 25MB, post_max_filesize to 27MB, and memory_limit to 30MB.
Here are the steps you can take to increase the upload limit. Depending on your server, any one of them should work.
PHP.ini contains the PHP configuration for your server. You can find it in the root directory of your server. Go to your hosting root directory and search for the php.ini file. Due to security reasons, it might be hidden, so don’t forget to check “Show hidden files”.
Open the php.ini file with any text editor and search for the three settings to modify them according to your requirement. We’ll use the following numbers for this example:
File size to be uploaded: 20MB.
If you didn’t find the php.ini file, don’t worry! You can create it with a Right Click of your mouse and selecting Add New File. Open the new file and paste the three lines above and save it as php.ini.
Sometimes your server’s php.ini file is named as php5.ini, hence, don’t get confused between the two.
.htaccess is an important file and contains various configurations for your server. Most hosting providers keep it hidden though. To modify it, you need to check “Show Hidden Files” once again and locate the .htaccess file within the root directory of your server.
Open it with an editor and paste these three lines at the end of the file where it says #END WordPress:
If you don’t find the .htaccess file, you can create one and paste the default WordPress .htaccess file attributes and then paste the three lines above to increase the upload limit.
If the above two methods didn’t work for you, there is always an alternative. You can paste the following 3 lines within your WordPress files. These lines can be written in wp-config.php, themes functions.php file etc. However, this is not the recommended way to increase the upload file size limit.
Some WordPress Hosting providers like Cloudways have a built-in feature to change the file size limit. Here is how you can do it directly from the platform if you have Cloudways as your hosting provider:
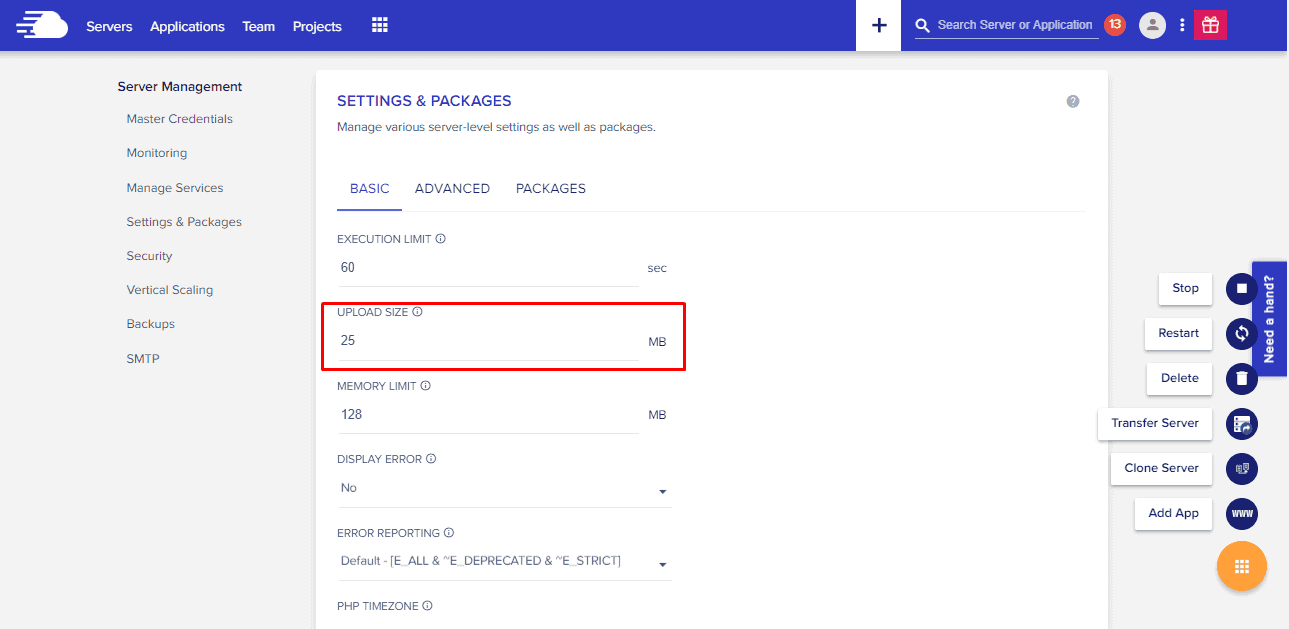
Go to Servers from the bar on the top and get into your desired server. Select Settings & Packages from the left pane and you’ll see Upload Size under the basic settings tab. Change it to your requirement. In our case, we’ll use 25MB.
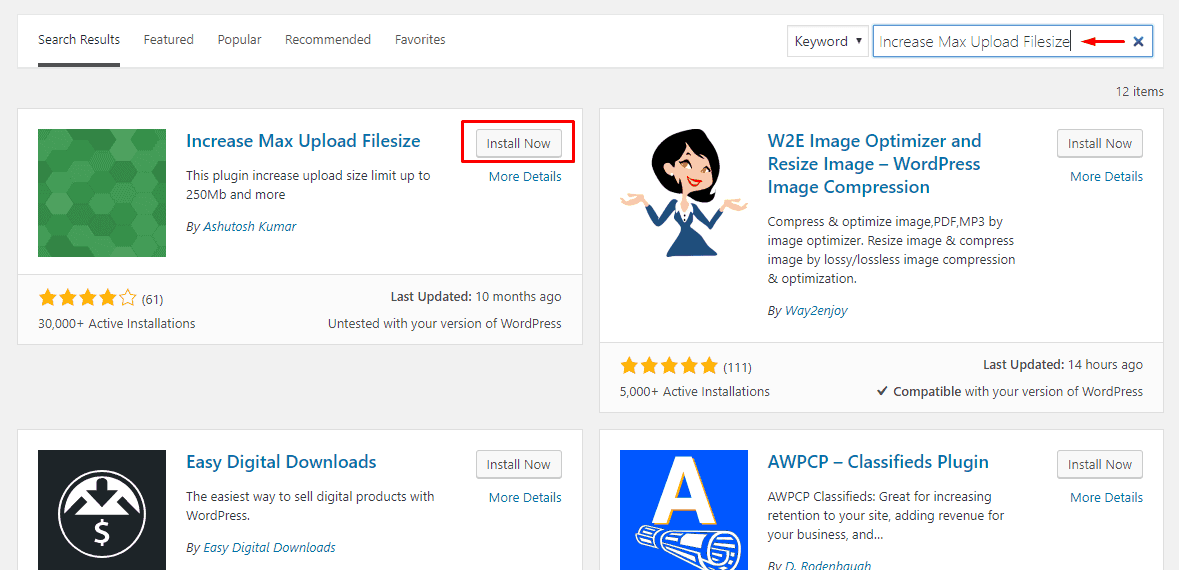
If you don’t want to do it manually, there is always a plugin in the WordPress repository. You just need to find the right plugin that is compatible with your current WordPress version. Try using Increase Upload Max Filesize which is compatible with the latest version of WordPress.
From the left pane of your WordPress Dashboard, navigate to Plugins -> Add New, search for the Increase Upload Max Filesize plugin from the top right corner, and Install it.
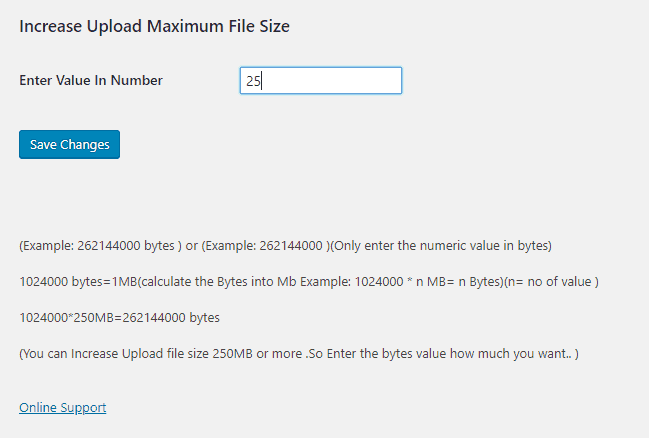
Once the plugin is activated; navigate to its settings and enter the desired size for your new upload size.
That’s it! You have just increased the WordPress Maximum Upload File Size Limit.
If nothing else works, simply ask your hosting provider to increase the file size upload limit on your WordPress application and they’ll surely help you out.
—
If you know any other means to increase the file upload size limit, feel free to share it by using the comment section below. Also, let us know which option worked perfectly for your WordPress application!
Basically, there are three ways to upload files in WordPress:
Log in to your hosting provider by accessing their online file manager.
Connect to your server via an FTP client like FileZilla.
Upload your media, themes, or plugin files directly from the WordPress Dashboard.
If you want to upload anything other than media, themes or plugins, you can always upload them via a file manager. However, for all normal uploads, simply navigate to your desired location within the WordPress Dashboard and choose to add/upload file.
For example, if you want to add a video, navigate to Media -> Add New and either select the file from your computer or you can just drag and drop it in the box. Here’s a screenshot:
Did you notice something weird, though? No, not in the article. In the screenshot above. Yes, the maximum upload file limit of just 5MB. Isn’t this off-putting? And this limit also applies when you want to upload a theme or plugin directly from the WordPress Admin Dashboard. This threshold varies from hosting to hosting though. Some even allow only 2MB by default while others may allow more.
Don’t worry though; we’re here to tell you exactly how to increase the upload limit.
Let’s get started without further ado.
While there are several ways to remove this cap on file size, we’ll be working with three settings within PHP that should deal with the upload limit. Let’s define the settings first so that you know what you’re actually doing:
upload_max_filesizeThis defines the maximum upload limit for files.
post_max_sizeThis defines the maximum upload limit that will be handled in a POST request.
memory_limitThis defines how much memory is allocated for PHP. This number should be equal or higher than the upload_max_filesize.
Let’s assume we have a 20MB file. We’ll set the upload_max_filesize to 25MB, post_max_filesize to 27MB, and memory_limit to 30MB.
Here are the steps you can take to increase the upload limit. Depending on your server, any one of them should work.
- CreateOrModify PHP.Ini File
PHP.ini contains the PHP configuration for your server. You can find it in the root directory of your server. Go to your hosting root directory and search for the php.ini file. Due to security reasons, it might be hidden, so don’t forget to check “Show hidden files”.
Open the php.ini file with any text editor and search for the three settings to modify them according to your requirement. We’ll use the following numbers for this example:
File size to be uploaded: 20MB.
upload_max_filesize = 25MB
post_max_size = 27MB
memory_limit = 30MB
If you didn’t find the php.ini file, don’t worry! You can create it with a Right Click of your mouse and selecting Add New File. Open the new file and paste the three lines above and save it as php.ini.
Sometimes your server’s php.ini file is named as php5.ini, hence, don’t get confused between the two.
- Create Or Modify.Htaccess
.htaccess is an important file and contains various configurations for your server. Most hosting providers keep it hidden though. To modify it, you need to check “Show Hidden Files” once again and locate the .htaccess file within the root directory of your server.
Open it with an editor and paste these three lines at the end of the file where it says #END WordPress:
php_value upload_max_filesize 25MB
php_value post_max_size 27MB
php_value memory_limit 30MB
If you don’t find the .htaccess file, you can create one and paste the default WordPress .htaccess file attributes and then paste the three lines above to increase the upload limit.
- Modifying A WordPress File
If the above two methods didn’t work for you, there is always an alternative. You can paste the following 3 lines within your WordPress files. These lines can be written in wp-config.php, themes functions.php file etc. However, this is not the recommended way to increase the upload file size limit.
@ini_set( ‘upload_max_size’ , ’25MB’ );
@ini_set( ‘post_max_size’, ’27MB’);
@ini_set( ‘memory_limit’, ’30MB’ );
- directly from the Platform
Some WordPress Hosting providers like Cloudways have a built-in feature to change the file size limit. Here is how you can do it directly from the platform if you have Cloudways as your hosting provider:
Go to Servers from the bar on the top and get into your desired server. Select Settings & Packages from the left pane and you’ll see Upload Size under the basic settings tab. Change it to your requirement. In our case, we’ll use 25MB.
5. Plugin
If you don’t want to do it manually, there is always a plugin in the WordPress repository. You just need to find the right plugin that is compatible with your current WordPress version. Try using Increase Upload Max Filesize which is compatible with the latest version of WordPress.
From the left pane of your WordPress Dashboard, navigate to Plugins -> Add New, search for the Increase Upload Max Filesize plugin from the top right corner, and Install it.
Once the plugin is activated; navigate to its settings and enter the desired size for your new upload size.
That’s it! You have just increased the WordPress Maximum Upload File Size Limit.
- The Last Resort Option
If nothing else works, simply ask your hosting provider to increase the file size upload limit on your WordPress application and they’ll surely help you out.
—
If you know any other means to increase the file upload size limit, feel free to share it by using the comment section below. Also, let us know which option worked perfectly for your WordPress application!
